Searching: tftp - 16 Results Found

VTrak Ex10 How can I retrieve the "Save Configuration" information on my VTrak Mx10 or E-Class Ex10 RAID?
Ken Chou posted this 08 May 2008

In order for Promise Technical Support to provide the highest level of service, Promise Technical Support will request that you provide the following:

  1. Chassis SN#
  2. TLA# (can be found on the chassis sticker next to SN#)
  3. Subsystem information report (subsysteminfo)

The Save Configuration feature was introduced on M-Class Mx10 and E-Class Ex10 RAID. For security reasons we strongly recommend to always use a password i.e. don’t leave the password field blank.

Saving the VTrak subsystem information report (subsysteminfo):

To save the subsysteminfo via WebPAM:

Once logged in on the left hand side in the upper corner of your screen there is a window pane that will show the IP address of the VTrak RAID (see screen capture below).

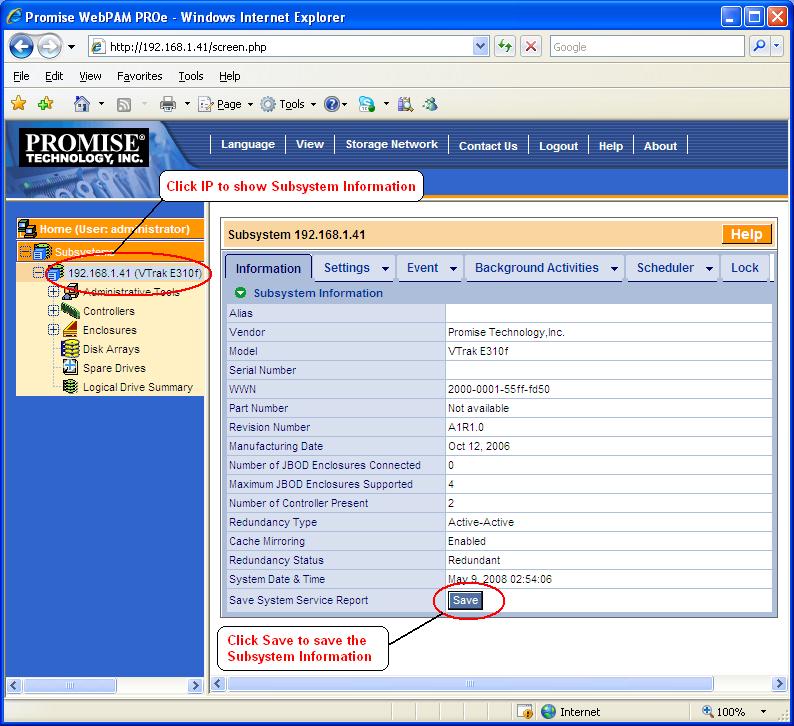
Click on the IP address. Once the new page comes up after clicking on the “Save” button you will be prompted to save the subsystem configuration (see screen capture below).

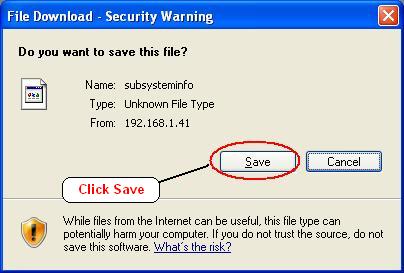
Once you click Save, choose a location for the file that will be easy to find; like your Desktop.


To save the subsysteminfo via the CLI:

You may also save the configuration information (subsysteminfo) from the CLI. To retrieve the configuration information you can issue the following command from CLI (example):

 export -t subsystem -f subsysteminfo.txt -s 192.168.7.100


Note: CLI requires that you use TFTP. A TFTP server will be necessary

VTrak Other Using WebPAM for firmware updates on the VTrak Mx10 products may cause some issues.
Ken Chou posted this 16 April 2008

Summary:

Due to some issues seen with updating the firmware for VTrak Mx10 products via WebPAM, Promise Technology recommends performing all firmware updates on the VTrak Mx10 family via the CLU/CLI and TFTP server. This issue only effects the M210, M310 and M610 VTrak products.

Note - It is recommended to stop all I/O and Disk activity on the VTrak before updating the firmware. In the event of an error after the firmware flash, please contact Promise Technical Support for additional assistance: https://support.promise.com


Updating the firmware from the CLU

  1. Download the Free TFTP server from solarwinds.net site. A link is given below for download location.
     
  2. Install the Solar Winds TFTP server software. Reboot server after installation
     
  3. Download the latest VTrak MClass firmware update
     
  4. Launch the TFTP server
     
  5. Copy the firmware image file (*.img) to the C:\TFTP-Root Folder
     
  6. From the TFTP server, go to File and click on Configure. Click on the Security tab and make sure you enable Transmit and Receive.
    • You need to keep the TFTP server running to upgrade the firmware.
       
  7. Setup a serial connection to the VTrak controller and use HyperTerminal to log in
    • Check that the terminal settings are 115200, 8 bit, 1 stop bit, no parity, no flow control.
    • When the HyperTerminal window opens, press ENTER to start the CLU 
    • For more information on making the serial connection, please see your VTrak user manual.
       
  8. From the CLU's Main Menu, select Additional Info and Management, and then press Enter 
     
  9. Select Flash Through TFTP and then press Enter. Verify TFTP server IP address is the same IP address as the host PC. If TFTP server IP address is incorrect, you will be unable to download the firmware image from TFTP server.
     
  10. Select TFTP Server
    • Type the IP of TFTP server. This should be the same IP address as your host computer.
    • Port number: 69.  This is the default for TFTP server
    • File Name: Enter the filename of the firmware image to upload.
       
  11. Then select [start] and then press Enter. After pressig Enter, firmware download from the tftp server will begin. You should see the file being extracted from the host system.
     
  12. Once the firmware is complete, please be sure to reboot the VTrak.


Updating the firmware from the CLI

Steps 1 though 6 are same as above.

  1. Connect to the VTrak controller via serial or telnet connection and use HyperTerminal to log in
    • For serial: Check the following settings: 115200, 8 bit, 1 stop bit, no parity, no flow control.
    • For telnet: Telnet to the VTrak's IP address; port 2300
       
  2. When the HyperTerminal window opens, press ENTER and log in,
    • If the session opens into the CLU menu, type CTRL-X or choose Return to CLI from the main menu.
       
  3. At the CLI, type ptiflash -t -s -f
    • example: ptiflash -t -s 192.168.1.1 -f fw_multi_20031010.img
       
  4. Once the firmware update is complete, please be sure to reboot the VTrak.


Close