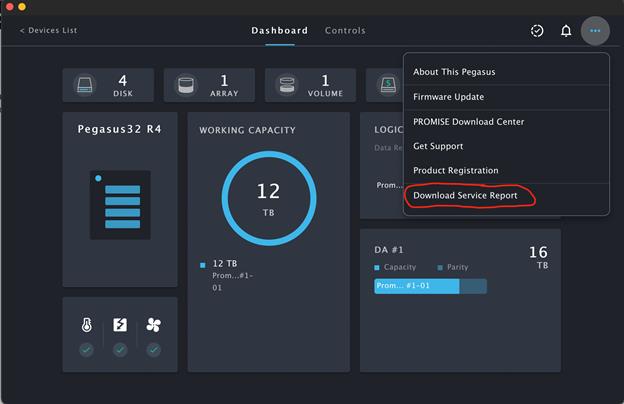
Prior to calling Promise Technical Support for any Pegasus32 related issues, please capture and prepare the Service Report:
This Knowledge Base article is about the Pegasus Pro Utility. Here is a download link to the Pegasus Pro Utility.
Please download and install the Pegasus Pro Utility if you don't already have it installed.
Then...
- Open the Promise Utility Pro, click on the three dots “…” on the right side of the pane, and then click Download Service Report.

For the latest Promise Utility Pro, click on "Controls" tab menu, and then click Device Service Report.

- If this is successful, then it will open a new window for you to choose a folder to save the report. After that, you may use Finder to see that the file has been created in the folder.
If a Service Report can't be saved for some reason, this is the manual method.
- Open the Mac OS Terminal session: In Finder, go to Applications, then open Utilities, then open Terminal.
- At the "$" prompt, type
-
cd "/Applications/PROMISE Utility Pro.app/Contents/Resources/"
-
promiseutil
and press Enter. If Promise Utility Pro is installed, this command will change the prompt to
cliib>
-
At the cliib> prompt, type each of the following commands on their own line, pressing Enter after each one:
subsys -v
enclosure -v
ctrl -v
phydrv
phydrv -v
array -v
logdrv -v
checktable -l 0
event
event -l nvram
Once that is done, then in the Applications folder, open TextEdit, and from File select New Document.
Select All from the Terminal window and Copy the entire terminal session to your clipboard; then, Paste it into the TextEdit document. Finally, Save the TextEdit document as a "Rich Text File" with the name servicereport.
These logs are vital in assisting Technical Support for resolution of any issues.
This links to a Promise KB article on how to attach files to a web support case:
https://kb.promise.com/thread/how-to-attach-files-to-your-web-case/


