Searching: Power - 135 Results Found

VTrak Other Replacing a Cache Battery on the Ex10f/Mx10 series subsystem
Ken Chou posted this 18 May 2010

Replacing a Cache Battery

The cache battery is located inside the cooling unit. The battery assembly is
replaced as an individual part.

Caution
• Try reconditioning the battery before you replace it. See
page 128 or page 183 for more information.
• The battery assembly is replaced as a unit. Do not attempt to
disconnect the battery by itself.
• Installing the wrong replacement battery can result in an
explosion.
• Dispose of used batteries according to the instructions that
accompany the battery.
• While the battery is removed, your system will be vulnerable
to data loss if the power fails while data is being written to the
logical drives.
• If power service has failed, do not remove the cooling unit if
the Controller’s Dirty Cache LED is flashing. See “Browser
Does Not Connect to WebPAM PROe” on page 351.

To replace a cache battery:
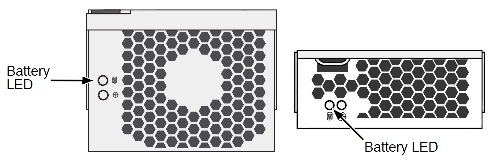
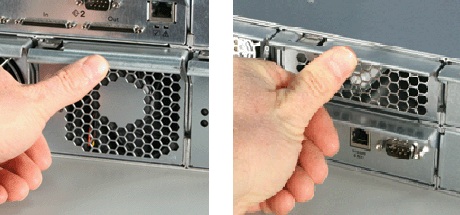
1. Verify that the Battery LED is amber or red. See Figure 13.
Figure 13.Fan LED (left: E610f/s, right: E310f/s)


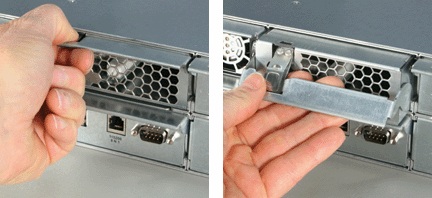
2. Press the release button and pull the handle downward as shown above.
3. Pull the cooling unit out of the VTrak enclosure. See Figure 14 (E610f/s) or
15 (E310f/s).

Figure 14.Removing the cooling unit from the enclosure from the E610f/s

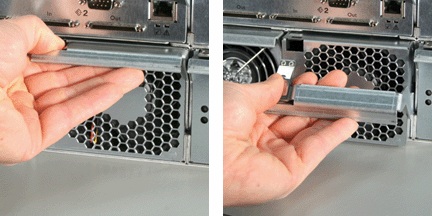
Figure 15.Removing the cooling unit from the enclosure from the E310f/s

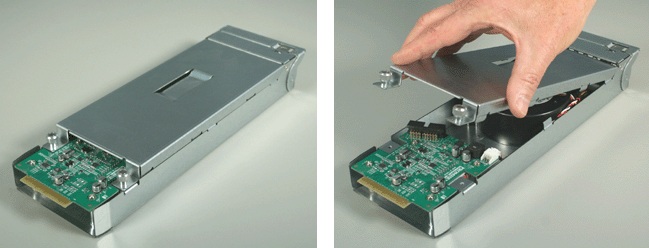
3. Loosen the thumbscrews. A retainer keeps the thumbscrews in place.
4. Grasp the top section near the thumbscrews and lift it off the bottom section.
Separate the cooling unit sections to access the battery assemble. See
Figure 16 (E610f/s) or 17 (E310f/s).

Figure 16.Loosen the thumbscrews and remove the cover (E610f/s)

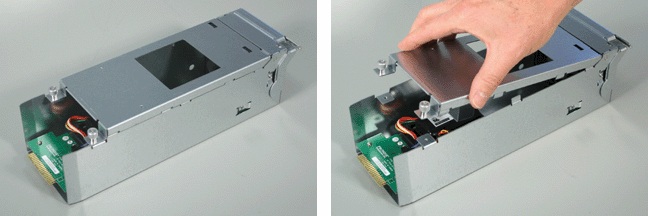
Figure 17.Loosen the thumbscrews and remove the cover (E310f/s

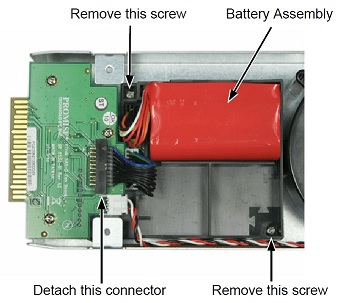
5. Remove the two screws holding the battery assembly in place.
6. Detach the connector on the circuit board.
Do not detach any other connectors. See Figure 18 (E610f/s) or 19
(E310f/s).

Figure 18. Removing the battery assembly (E610f/s)

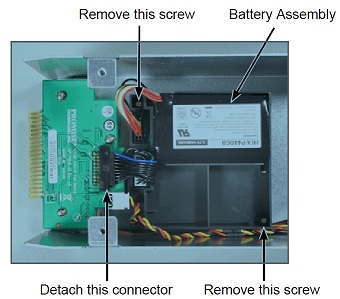
Figure 19. Removing the battery assembly (E310f/s)

7. Lift the battery assembly out of the cooling unit.
8. Place a new battery assembly into the cooling unit.
9. Attach the connector on the circuit board.
10. Install the two screws holding the battery assembly in place to the cooling
unit.
11. Place the top section of the cooling unit onto the bottom section and tighten
the thumbscrews.
12. Carefully slide the cooling unit into the enclosure.
13. Gently press the handle in and upward until it locks. See Figure 20.

Figure 20.Locking the cooling unit handle (left: E610f/s, right: E310f/s

This completes the battery replacement procedure.

Exert from the VTRAK E-Class E610f, E610s, E310f, E310s Product Manual Pages 265-268

This procedure will also work for the VTRAK Mx10 series subsystems.

VTrak Other How do I Resignature my LUN in VMware In ESX 4.0
Ken Chou posted this 03 May 2010

How do I Resignature my LUN in VMware

In ESX 4.0


Making this type of change on the storage array results in assigning a new LUN ID (UUID or Serial Number) to all LUNs presented via the HBA ports.


VMFS3 metadata identifies the volumes by several properties which include the LUN number and the LUN ID (UUID or Serial Number). Because the LUNs now have new UUIDs, the resulting mismatch with the metadata leads to LVM identifying the volumes as snapshots.


You must resignature the VMFS3 volumes to make them visible again.


Caution:

  • Before performing the steps in this article:
    • Wait for a maintenance window
    • Make sure all virtual machines are backed up properly
  • Do not deviate from these steps. 

To resignature the VMFS3 volumes from the command line:

  1. Power off all virtual machines on all ESX hosts that are stored on the volume.
  2. Run the following command to re-read the volume on each ESX host:

    # vmkfstools -V

    If this works, the problem is resolved. If this does not work, proceed to step 3.
  3. Remove all of the same virtual machines from the inventory in the VirtualCenter server.

    Warning: Do not delete the virtual machines from disk. Remove them from the inventory.
  4. Log in to each host.
  5. Run the following command to verify which HBAs are providing access to the LUN:

    # esxcfg-mpath -l | less
  6. To set the ESX host to resignature all datastores detected as snapshots on the next rescan, run the following command:

7.       

    • For ESX Classic:

      # echo "1" /proc/vmware/config/LVM/EnableResignature
    • For ESXi:

      # esxcfg-advcfg -s 1 LVM/EnableResignature
  1. To rescan the storage and perform the resignature on volumes detected as a snapshot, run the command:

    # vmkfstools -V
  2. To disable the resignature flag, run the following command:

    Warning:
    Do not skip this step.
    • For ESX Classic:

      # echo "0" /proc/vmware/config/LVM/EnableResignature
    • For ESXi:

      # esxcfg-advcfg -s 0 LVM/EnableResignature
  3. To ensure that the volumes stay mounted after resignaturing is turned off, run the command:

    # vmkfstools -V
  4. Reinventory the virtual machines.

a.       Open VI Client to the VirtualCenter Server. The virtual machines show as inaccessible.

b.      Right-click on the virtual machine and click Remove From Inventory.

c.       Double-click the datastore to bring up the datastore browser.

d.      Select the folder in which the virtual machines resides.

e.       Right-click the virtual machine file (extension .vmx) or template file (extension .vmtx)

f.        Click Add to Inventory.

g.       Follow the wizard.

Close