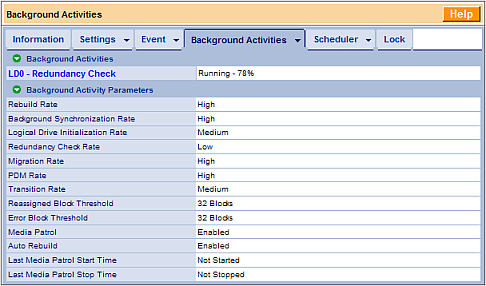
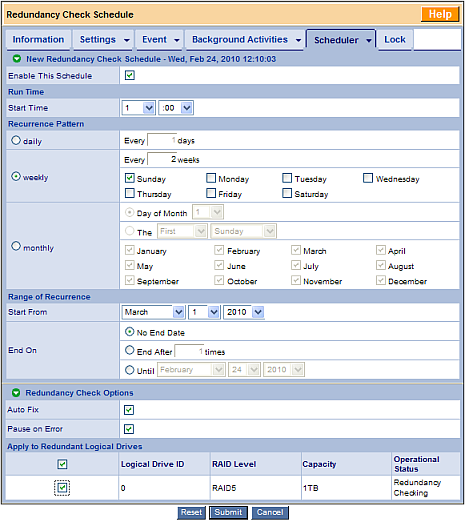
How do I start, stop, pause, view the progress of, and schedule Redundancy Check in WebPAM PROe? Redundancy Check is a routine maintenance procedure for fault-tolerant disk arrays that ensures all of the user data is protected correctly by checking data consistency for both parity and mirrored data, while checking the media integrity as well. RC operates on a logical drive basis, and it only works for redundant RAID configurations, which does not include RAID 0. When encountering an error, the user has the choice of repairing the consistency or media error, or just reporting the error without repairing it. It is recommended that an RC is performed on a regular scheduled basis. To manually start Redundancy Check: Click on the Subsytem icon - denoted by the IP address for the unit - in the tree menu. Expand the Logical Drive Summary and click on the Logical Drive you want to perform the Redundancy Check on. Click on the drop-down arrow on the Background Activities tab and select Redundancy Check from the menu. The Auto Fix function will attempt to repair any errors that are encountered. The Pause On Error parameter will stop the Redundancy Check process when it encounters a error, but if Auto Fix is also checked the Redundancy Check process will stop only when it encounters a non-repairable error. Click on the check-box to apply the desired parameter. Click the Submit button to make the parameter changes. To view the progress of a Redundancy Check: Click on the Logical Drive you want to perform the Redundancy Check on and click on the Background Activities tab to display the status and progress of the process. You can also view the progress of all running processes, if for instance you have Redundancy Checks running on more than one Logical Drive, by clicking on the Subsytem icon in the tree menu and selecting the Background Activities tab. To pause, resume, or stop a Redundancy Check process: Click on the Subsytem icon in the tree menu and select the Background Activities tab to view a list of any Redundancy Checks that are running on the Logical Drives. Click on the Logical Drive you want to manage under the Background Activities section. You can pause or stop the selected Redundancy Check by clicking the appropriate button. To view the priority level for the Redundancy Check process: Click on the Subsytem icon in the tree menu and select the Background Activities tab. The Background Activity Parameters section will list the priority levels for all of the background activities. Here is a summary of the three available priority levels: Low allocates fewer system resources to the background process and more to data read/write operations. Medium allocates a balance of system resources between the background process and data read/write operations. High allocates more system resources to the background process and fewer to data read/write operations. To change the priority level of a background process cl ick the drop-down arrow on the Background Activities tab and select the Settings item. The Background Activity Settings page allows you to change the priority level of any of the background processes to one of the three values summarized above, Click on the Submit button to accept the changes. By using the Background Activity Scheduler you can select the exact times and days that any of the background processes will be run, as well as the start and end dates of the scheduled activity. To schedule a Redundancy Check, c lick on the Scheduler tab and select the Add Reductancy Check Schedule item. The Redundancy Check Schedule form allows you to schedule a Redundancy Check on any available Logical Drive. You can select the start time, frequency, and schedule period, as well as setting the Auto Fix and Pause on Error parameters. This example is scheduled to start a Redundancy Check on Logical Drive 0 at 1 A.M. every second Sunday, beginning March 1, 2010, without an expiry date, and both Redundancy Check Options have been selected. Click the Submit button to save the schedule.Starting Redundancy Check
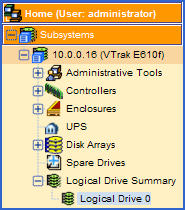


Redundancy Check Progress

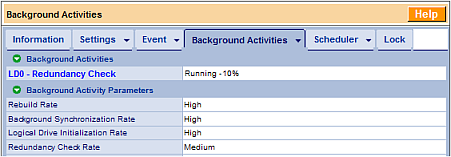
Managing Redundancy Check


Redundancy Check Priority
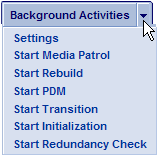

Redundancy Check Scheduling

What is Redundancy Check
- Topic Is Locked
- 10K Views
- Last Post 21 November 2009
Ken Chou
posted this
21 November 2009

