If you lose your old OS or accidentally remove critical system files, follow these steps to reinstall the operating system using the Promise VessA Image Writer Utility and the specified images for each VessA product:
Preparation Steps
- Download Required Tools and Files
- Download the Promise VessA Image Writer Utility:
- Download the Appropriate OS Image for Your Machine:
- Locate the OS version on the OS Sticker on the chassis.
- Visit the Download Center on the Promise website, select the VessA product, and download the respective installation image under the Image Tab


Creating the Bootable USB Drive
-
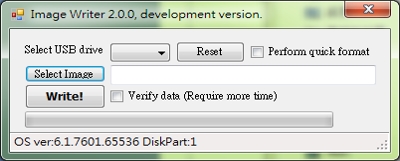
Start the Image Writer Utility
- Insert a USB drive into your computer.
- Open the Image Writer Utility.
-
Set Up the USB Drive
- Select the USB drive from the list of available drives.
- Check the Perform Quick Format option.
-
Load and Write the OS Image
- Select the downloaded OS image.
- Click Write! to start writing the OS image to the USB drive.
- Wait for the process to finish.

Installing the New OS on the VessA Machine
-
Boot from the USB Drive
- Insert the prepared USB drive into the VessA machine.
- Power on the machine. It will boot directly from the USB.
-
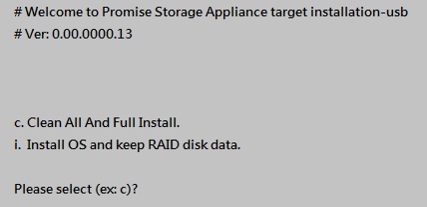
Select Installation Options
- When prompted, choose between the following options:
- Option C:
- Updates the BIOS.
- Installs the OS to the DOM module (includes drivers and software tools).
- Deletes the old RAID configuration and creates a new RAID disk.
- Warning: Selecting this option will erase the existing RAID configuration.
- Option I:
- Updates the BIOS.
- Installs the OS to the DOM module (includes drivers and software tools).
Important Notes
- Power Stability: Keep the power source stable during the BIOS update to avoid corruption.
- VessA3340 or certain Models: These may require additional reboots during the BIOS update phase.
- RAID Warning: Selecting C Option will erase existing RAID configurations.
- Option C:
- When prompted, choose between the following options:
-
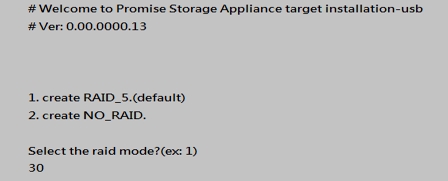
Choose RAID Configuration
- Select the desired RAID type for your setup.
- Wait for the installation to finish.


Finalizing the Installation
-
System Reboot
- During the process, the BIOS will be updated, and the system may reboot automatically.
- Do Not Remove Power during this process.
-
Shutdown and Remove USB
- Once the installation is complete, press Space to shut down the machine.
- Remove the USB drive before powering on the system again.
-
Set Up the Operating System
- Power on the machine. It will boot directly into Windows.
- Configure the initial settings:
- Select your language.
- Create a password.
- Add the activation key from the sticker on the chassis.
Your VessA Machine is Now Ready for Use
- For any additional configurations, consult the VessA Product manual or contact Promise Technical Support.
Note: Always ensure a stable power source throughout the installation process to avoid interruptions.

