Replacing the Cache Battery
The cache battery, or Battery Backup Unit (BBU), is located inside the RAID
Controller. The battery assembly is replaced as a unit.
Cautions
• Try reconditioning the battery before you replace it. See
page 94 or page 143 for more information.
• If power service has failed, do not remove the RAID Controller
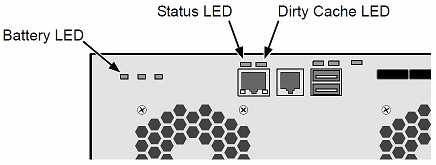
if the Dirty Cache LED is lighted. See Figure 5. Wait until
power service is restored.
• Only a qualified technician should perform this procedure.
• You must shut down the VessRAID subsystem before you
can perform this procedure.
• Installing the wrong replacement battery can result in an
explosion.
• Dispose of used batteries according to the instructions that
come with the battery.
To replace the cache battery:
1. Verify that the Battery LED is amber or red. See Figure 5.
Figure 5. VessRAID enclosure LED

2. Shut down the VessRAID. See “Shutting Down the Subsystem” on page 82
or page 188.
3. Remove the RAID Controller.
See “Replacing a RAID Controller” on page 225. (Section Included Below)
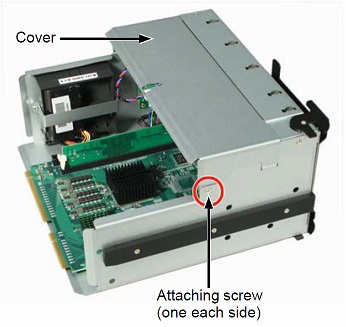
4. Lay the RAID Controller on a non-static surface and remove the cover
attaching screws, one on each side, then remove the cover.
See page 227, Figure 3.
Figure 3. RAID Controller cover and attaching screw

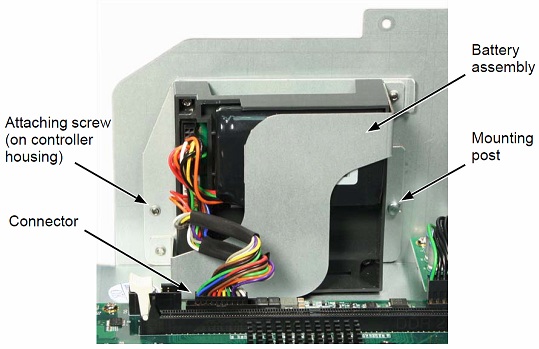
5. Remove the battery assembly attaching screw on the outside of the RAID
controller housing.
6. Detach the battery connector and remove the battery assembly.
Figure 6. RAID Controller cache battery

In the above photo, the memory module was removed so you can see the
battery connector. You do not have to remove the memory module to replace
the battery assembly.
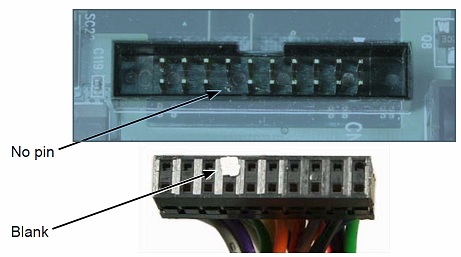
7. Attach the connector of the new battery assembly.
Figure 7. Battery connector pin

8. Put the battery assembly into place and install the attaching screw.
9. Replace the RAID Controller cover and install the two attaching screws.
See page 227, Figure 3.
10. Reinstall the RAID Controller.
See “Replacing a RAID Controller” on page 225.
This completes the cache battery replacement procedure.
Exert from the "VessRAID 1000s Series Product Manual" pages 228-230
Replacing a RAID Controller
The RAID Controller monitors and manages the logical drives. When the
controller is replaced, all of your logical drive data and configurations remain
intact because this logical drive information is stored on the disk drives.
RAID Controller failure is rare. But you might have to remove and reinstall the
same RAID Controller in order to replace a cooling fan, cache battery, or memory
module as described in this chapter.
Caution
• Do not replace the RAID Controller based on LED colors
alone. Only replace the RAID Controller when directed to do
so by Promise Technical Support. See page 305.
• Only a qualified technician should perform this procedure.
• You must shut down the VessRAID subsystem before you can
perform this procedure.
Removing the old controller
To replace the RAID Controller:
1. Shut down the VessRAID. See “Shutting Down the Subsystem” on page 82
or page 188.
2. On the RAID Controller, loosen the thumbscrew, swing the latch to the right
and pull the RAID Controller out of the enclosure.
3. Disconnect the SAS, Ethernet, serial, and power cables.
4. On the RAID Controller, loosen the thumbscrew, swing the latch to the right
and pull the RAID Controller out of the enclosure. See Figure 1.
Figure 1. Removing the RAID Controller

Installing the new controller
1. Verify that the new RAID Controller has a cache battery and memory module
installed.
If it does not have these items, transfer them from the old RAID Controller.
See page 228 and page 230 for more information.
2. Carefully slide the new RAID Controller into the enclosure.
3. Swing the latch to the left and secure it with the thumbscrew.
4. Reconnect the SAS, Ethernet, serial, and power cables.
5. Switch on the power.
The VessRAID restarts. For more information about VessRAID’s start-up
behavior, see “Connecting the Power” on page 21.
This completes the RAID Controller replacement procedure.
Exert from the "VessRAID 1000s Series Product Manual" pages 225-226

