Default Configuration:
- DHCP Enabled by Default – Connect the VTrak J5000 to a DHCP-enabled network to automatically assign an IP address.
- Retrieve the IP address from your router or use an IP scanner to locate the device.
- Optionally, configure a static IP address after initial setup.
Steps for Serial Connection Setup
1. Identify the COM Port
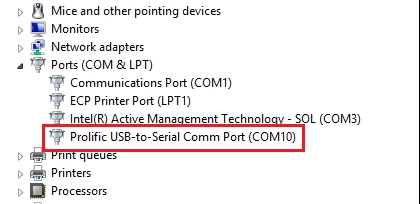
- Use Device Manager to check the available COM ports.
- COM1 and COM2 are typically reserved by the OS, even if no physical port is available.
- For modern systems without built-in serial ports, use a USB-to-Serial adapter (as shown in the example image).
Example: Adapter is recognized as COM10 in Device Manager.
2. Select a Terminal Emulator
- Recommended Tool: Tera Term (Free Terminal Emulator).
- Displays active COM ports for easier selection.
- Quick and simple configuration.
Alternative Tools:
- PuTTY
- HyperTerminal (Windows Legacy).
3. Connect to the VTrak J5000
- Baud Rate: 115200
- Data Bits: 8
- Parity: None
- Stop Bits: 1
- Flow Control: None
- Open the terminal emulator and select the correct COM port (e.g., COM10).
- Configure the connection settings as listed above.
- Press Enter after connecting to see the login prompt.
4. Login and Configure Settings
- Enter your login credentials (default:
administrator/password). - Use CLI commands to retrieve or configure settings:
- To Check Current IP Address:
net -l - To Set a Static IP Address:
net -m -i <IP_ADDRESS> -s <SUBNET_MASK> -g <GATEWAY>
- To Check Current IP Address:
Additional Tools and Documentation
- Windows Utility – Use for network configuration and monitoring.
- Product Manual – For in-depth configuration and troubleshooting steps.
- Utility Product Manual – Additional information about the management utility.
Important Notes
- Ensure the USB-to-Serial adapter drivers are installed and up-to-date.
- For networks without DHCP, manual static IP assignment will be required.
- Avoid using COM1/COM2, as these are often reserved by the operating system.
- Keep the terminal log file if contacting Promise Technical Support for assistance.


