Searching: serial connection - 10 Results Found

VTrak J5000 Configuring and Connecting to the Management Port on VTrak J5000 Series via Serial Connection
Babatunde Akinkuolie posted this 06 January 2025

Default Configuration:

  • DHCP Enabled by Default – Connect the VTrak J5000 to a DHCP-enabled network to automatically assign an IP address.
  • Retrieve the IP address from your router or use an IP scanner to locate the device.
  • Optionally, configure a static IP address after initial setup.

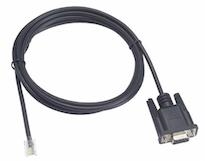
Steps for Serial Connection Setup

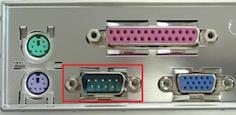
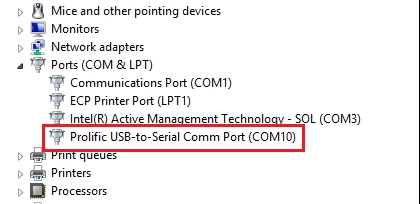
1. Identify the COM Port

  • Use Device Manager to check the available COM ports.
  • COM1 and COM2 are typically reserved by the OS, even if no physical port is available.
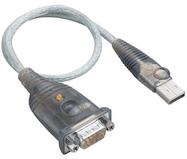
  • For modern systems without built-in serial ports, use a USB-to-Serial adapter (as shown in the example image).

Example: Adapter is recognized as COM10 in Device Manager.


2. Select a Terminal Emulator

  • Recommended Tool: Tera Term (Free Terminal Emulator).
    • Displays active COM ports for easier selection.
    • Quick and simple configuration.

Alternative Tools:

  • PuTTY
  • HyperTerminal (Windows Legacy).

3. Connect to the VTrak J5000

  • Baud Rate: 115200
  • Data Bits: 8
  • Parity: None
  • Stop Bits: 1
  • Flow Control: None
  1. Open the terminal emulator and select the correct COM port (e.g., COM10).
  2. Configure the connection settings as listed above.
  3. Press Enter after connecting to see the login prompt.

4. Login and Configure Settings

  • Enter your login credentials (default: administrator/password).
  • Use CLI commands to retrieve or configure settings:
    • To Check Current IP Address:
      net -l
      
    • To Set a Static IP Address:
      net -m -i <IP_ADDRESS> -s <SUBNET_MASK> -g <GATEWAY>

Additional Tools and Documentation


Important Notes

  • Ensure the USB-to-Serial adapter drivers are installed and up-to-date.
  • For networks without DHCP, manual static IP assignment will be required.
  • Avoid using COM1/COM2, as these are often reserved by the operating system.
  • Keep the terminal log file if contacting Promise Technical Support for assistance.


VESS R/J Family Setting up a serial connection to Vess R3600 and collecting all logs using the Command Line Interface (CLI)
Babatunde Akinkuolie posted this 30 December 2024 - Last edited 30 December 2024

Here’s a structured guide on setting up a serial connection to Vess R3600 and collecting all logs using the Command Line Interface (CLI).


1. Hardware Requirements

  • RJ11-to-DB9F cable (provided in the accessories box).
  • Computer (PC, Mac, Linux) with:
    • Embedded Serial Port or
    • USB-to-Serial Adapter for computers without serial ports.
  • Terminal Emulation Application such as:
    • PuTTY (Windows)
    • Tera Term (Windows)
    • Minicom (Linux)
    • Screen (Mac/Linux).

Promise RJ11-to-DB9F Cable

2. Connecting the Serial Cable

  1. Plug the RJ11 end of the cable into the Vess RAID controller (left-hand serial connector).

     2. Plug the DB9F end into your computer’s serial port or USB-to-Serial adapter.

USB-Serial Adapter

Computer Serial Port

3. Configuring the Terminal Emulator

  1. Launch your terminal application.
  2. Locate and select the appropriate COM port assigned to your serial connection. (For USB adapters, check your device manager to identify the assigned COM port).
  3. Set the following serial communication settings:
    • Baud Rate: 115200
    • Data Bits: 8 bits
    • Parity: None
    • Stop Bits: 1
    • Flow Control: None
  4. Open the connection.
  5. Press Enter or Return—you should see a login prompt.

4. Logging in to CLI

  1. Enter your username and password.(Note: The default user name is administrator.The default password is password)
  2. You will be greeted with the CLI prompt:
    administrator@cli
    

5. Collecting Log Data

Enable session logging (if supported by the terminal application) or manually copy outputs into a text file.

Run the following commands one by one and save the outputs:

  1. System Information

    subsys -v
    ctrl -v
    enclosure -v
    battery -v
    net -v
    
  2. Background Activities

    bga
    
  3. Fibre Channel Information

    fc -v
    fc -a list -t device
    fc -a list -t initiator
    
  4. Physical Drives

    phydrv
    phydrv -v
    
  5. Array Information

    array
    array -v
    
  6. Logical Drive Details

    logdrv
    logdrv -v
    
  7. LUN Mapping

    lunmap
    
  8. Event Logs

    event
    event -l nvram
    

    (Note: Last command has a lowercase 'L', not number '1').


6. Saving Logs

  • Enable Log Capture in the terminal emulator to save logs directly to a file.
  • Or, copy-paste the session output into a text document.

7. Provide Logs to Support

Send the saved log file to the Promise Technical Support Team as part of your support request.

Start Support Request Online:


Additional Notes

  • Custom Cable Requirements:
    If building your own cable, refer to the serial pinout diagram below or attached in this article

  • Network Unavailability:
    Serial access is a reliable fallback if network access is down.
  • Permissions:
    Ensure you have administrator-level access to the RAID system for complete log collection.

This process ensures you can securely gather logs for troubleshooting even without network access.

Close